Disclaimer:
A lot of the people asking me how to install WordPress on OSX have new babies. I’d like to apologize up front to the rest of the internet for bringing more new baby sites to the internet and thus hindering the speed at which we all can download music. Sorry.
How to install WordPress on OSX using MAMP
Since starting this web site I’ve gotten a lot of questions about how easy it is to use WordPress. The answer is it couldn’t be easier but, I would recommend that you setup a development environment first so you can test everything. That led to a second set of questions from all my friends that use OSX. How do I setup a test environment on my Mac? I know that the Apache web server is included in OSX but I can’t figure out MySQL or PHP. It’s true that OSX comes with Apache, and you could use it, but there is a much simpler way. Use MAMP.
MAMP stands for Mac, Apache, MySQL, and PHP. You have probably heard of LAMP (Linux, Apache, MySQL, and PHP) which is the standard web development platform on the internet. There is also WAMP; Windows, Apache, so on and so forth. One more acronym, WIMP; Windows, IIS (Internet Information Server. The default Windows web server), MySQL, and PHP. I’m so clever. You also might be thinking that I’m not very clever because I felt the need to explain what IIS was. In either case, I don’t care and you are probably correct.
All these acronyms provide all the necessary components to run WordPress locally on your given platform. In this case, the wonderful OSX.
Anyway, read on to learn how to install WordPress on OSX using MAMP.
Installing MAMP
Installing MAMP is just like any other application.
To start we need to go download and run the MAMP installer.
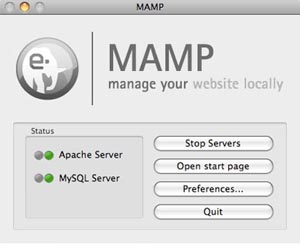
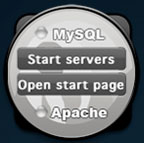
After the installation is complete, go to your Applications folder and locate MAMP. You can launch the Apache and MySQL servers by clicking the MAMP application icon. You can also install the widget to perform the same task from the dashboard. To do that, in the MAMP folder, you should see a black icon for installing the widget. Click the widget installer and OS X will ask you if you want to keep it, click keep. Once you have installed the widget you access it on the dashboard by hitting F12.
Tip
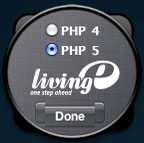
One of the cool things about MAMP is that you can use PHP4 or PHP5 for testing. If you hit the information icon on the widget (the “i” little towards the bottom of the widget) the widget will flip over and give you a choice of PHP 4 or 5. Neat if you are testing other things besides WordPress. You can also do this from the preferences if you launched MAMP from your applications folder.
Once you have installed and started MAMP, the default page displayed below should of come up in your browser. If it didn’t, you can click “Open Start Page” on the MAMP application or simply restart the servers using the widget. This page contains all the info we need to install WordPress.
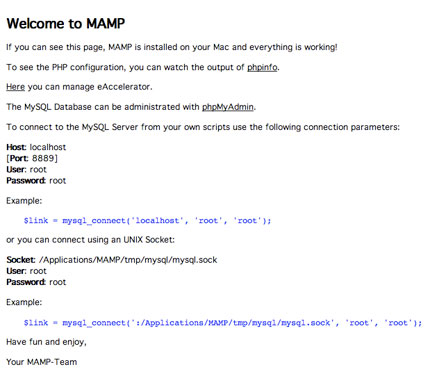
We will need the first four bold lines of this page to install WordPress. The host should be “localhost,” the port should be “8889,” and the user name and password should be “root.” Click on the phpMyAdmin link. We need to add a new database for WordPress. Because I’m not feeling creative, name it WordPress. You can call it what ever you want. Then click create. That’s it. Now we need to get WordPress.

Install WordPress
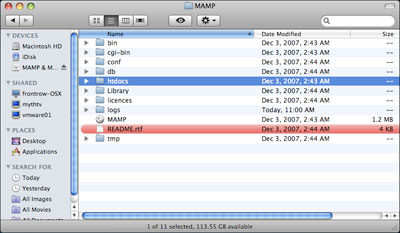
Go get WordPress. Once the download is complete, uncompress it and copy it to the “htdocs” folder under the MAMP folder on your applications menu.
Now we need to create a wp-config.php file.
Open TextEdit.
Tip
Make sure that TextEdit is in plain text mode instead of the default rich text mode. To do this, open TextEdit and goto TextEdit > Preferences and select Plain Text.
Open wp-config-sample.php in the Wordress directory you created in the htdocs folder and change the lines ‘DB_NAME’, DB_USER’, ‘DB_PASSWORD’, and ‘DB_HOST to match those below. Save the file as wp-config.php under the WordPress directory.
// ** MySQL settings ** //
define(‘DB_NAME’, ‘wordpress’); // The name of the database
define(‘DB_USER’, ‘root’); // Your MySQL username
define(‘DB_PASSWORD’, ‘root’); // …and password
define(‘DB_HOST’, ‘localhost:8889’); // 99% chance you won’t need to change this
define(‘DB_CHARSET’, ‘utf8’);
define(‘DB_COLLATE’, ”);
Finally, you need to open http://localhost:8888/wordpress/wp-admin/install.php. You can cut and paste that link into your browser. Once the WordPress install script is done you will be given a username and password. Write these down because you will need them to get in to the admin account. Now if you navigate to http://localhost:8888/wordpress/ you should see your default installation of WordPress.
Now you can play with WordPress off line without messing anything up.